Usage
Kayako Messenger is a new, more personal and effortless way to talk live with your customers across your Help Center, websites and apps.

Follow the instructions below to set up the Messenger and further customize its design and behaviour. In case you want a code snippet that Just Works™, skip to the "Working Example" section.
Getting Started
Note: Before you get started here, make sure you've followed the steps in the Integration Guide to get everything set up.
Integrating Messenger into your iOS app is really easy. All you have to do is simply instantiate a CustomerSuccessViewController and present it.
Let’s start with the invocation method (that's what we're calling the button tap/notification observer/however else you wish to present Messenger):
import MessengeriOS
import CustomerSuccess

//invocation method over here
func presentMessenger(in viewController: UIViewController) {

    //Configure
    let config = Configuration(brandName: <#Your brand name#>, instanceURL: <#Kayako URL#>, authorization: .auto, background: <#Background#>), primaryColor: <#UIColor#>, homeTitle: "<#Home Title#>", homeSubtitle: "<#Home SubTitle#>", homeTextColor: <#UIColor#>)
    let conversationNav = CustomerSuccessController(config: config)
    conversationNav.modalPresentationStyle = .custom

    //for a beautiful card like transition
    let cardTransitionDelegate = CardTransitioningDelegate()
    conversationNav.transitioningDelegate = cardTransitionDelegate

    //Present 🎉
    self.present(conversationNav, animated: true) { }
}
😮 That was a lot to take in, let's go over the Configuration object first (that determines the instance, authorization state, background of each view controller in the Messenger):
| Name | Description |
|---|---|
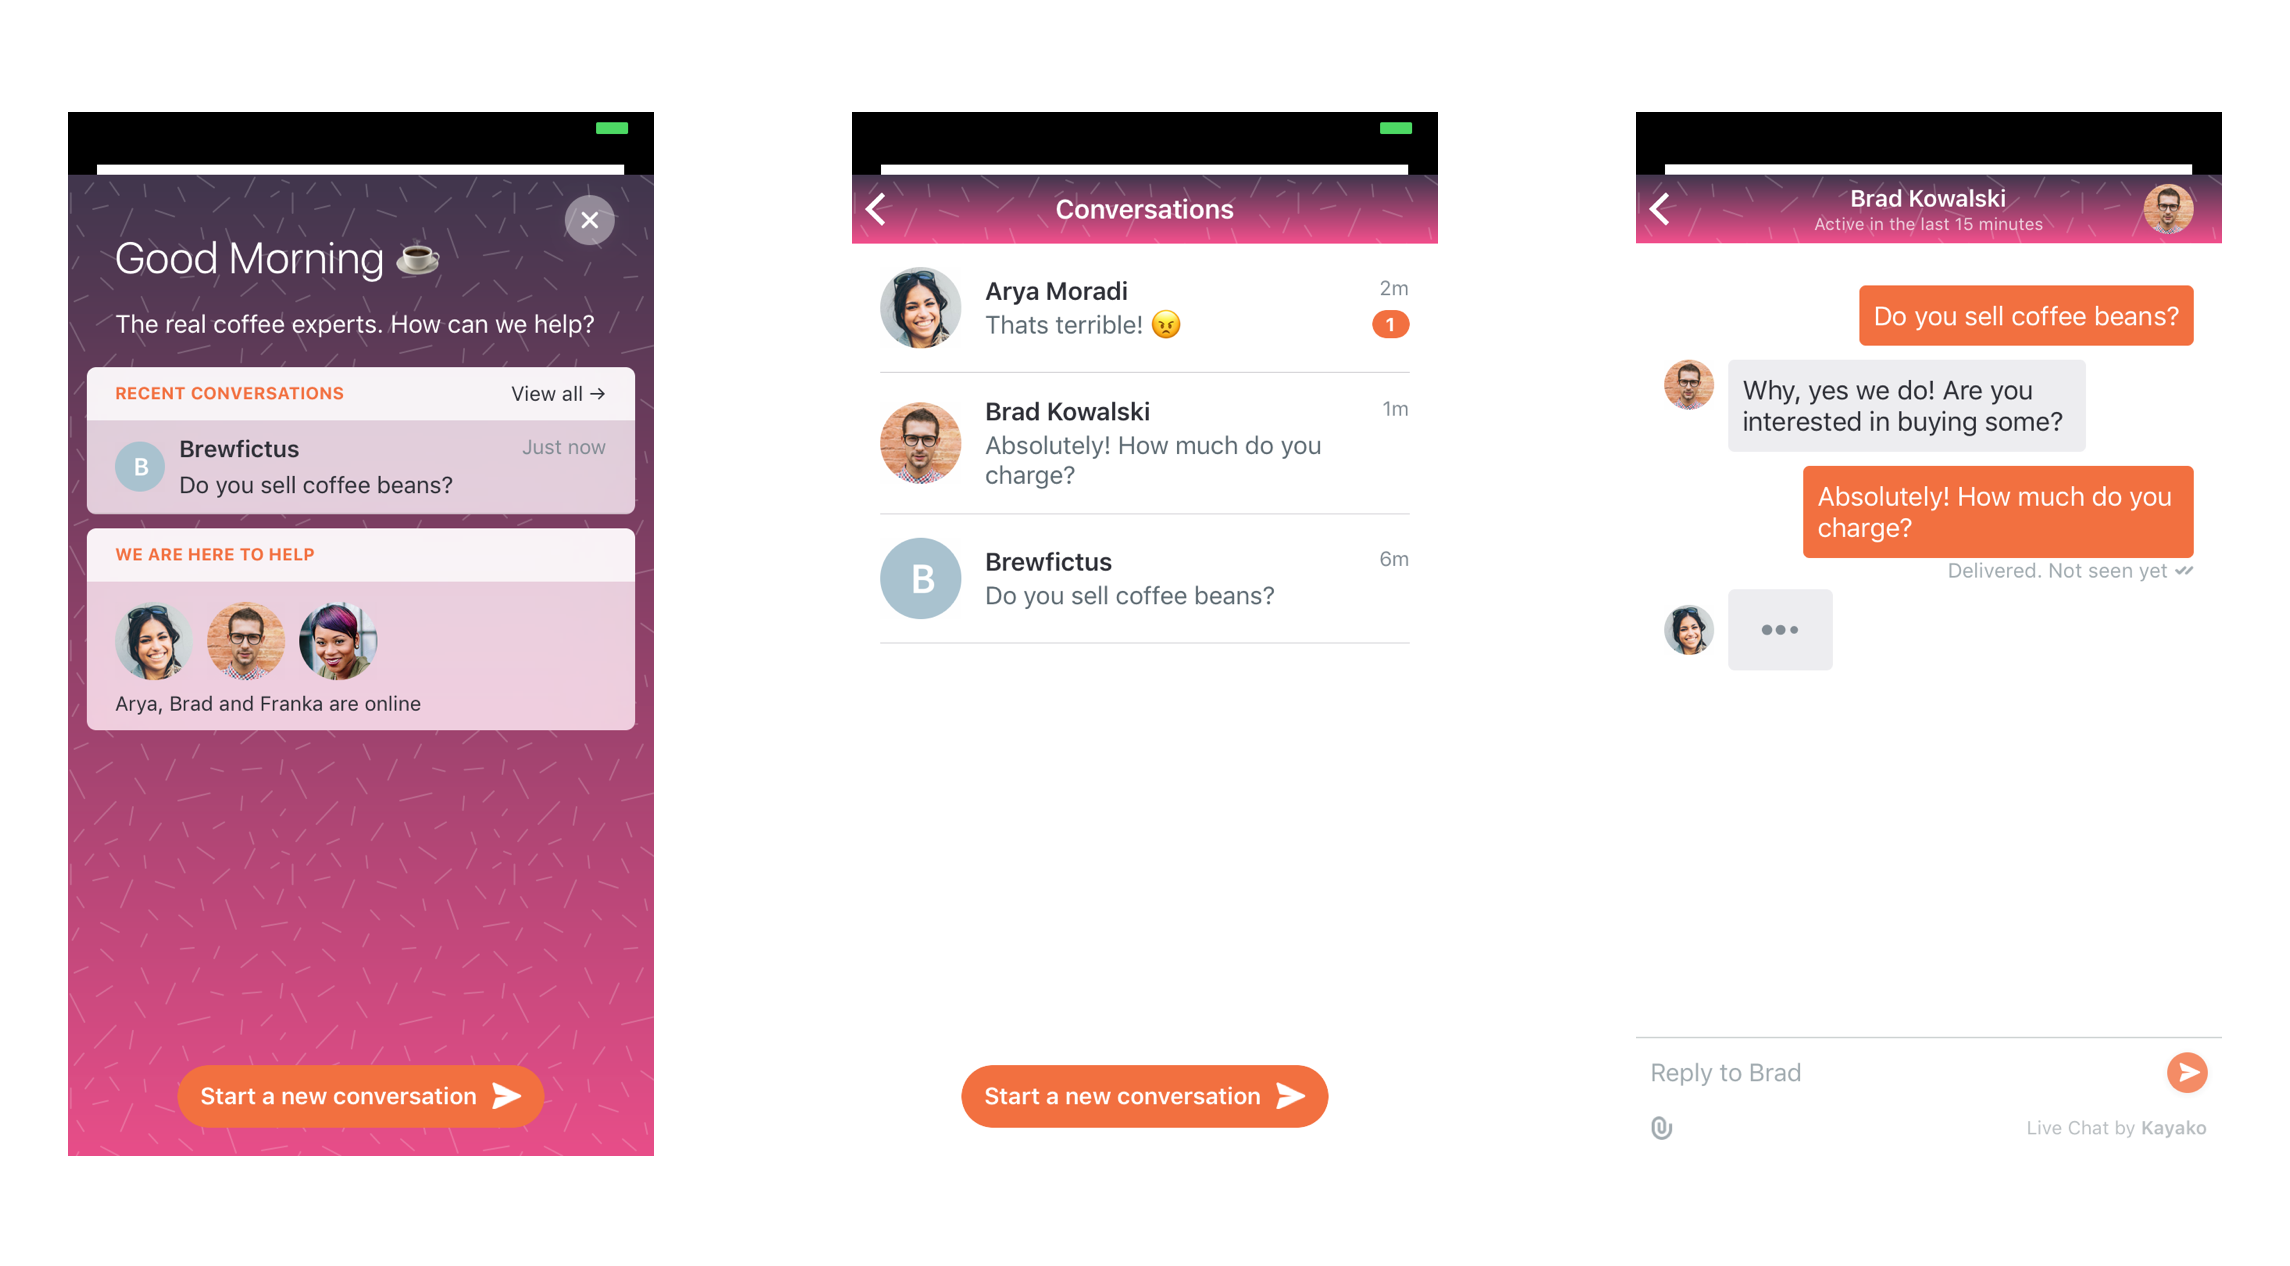
| brandName | The name of the Brand (Look at the figure below) |
| instanceURL | Your instance URL (for example, support.kayako.com) |
| authorization | Authorization mode. We recommend .auto, but in case you wish to provide the email for an already authenticated user, you can use .fingerprints and pass in a unique UUID and their login info |
| background | The background you wish to give. We have various choices, with gradients, patterns and combinations to customize according to your branding |
| primaryColor | Color that is used for various accents for buttons and labels |
| homeTitle | The callout text at the top of the home screen(Look at the figure below) |
| homeSubTitle | The description text at the top of the home screen(Look at the figure below) |
| homeTextColor | The color of the homeTitle and the homeSubTitle |


Primary Color
The primary color is used throughout the app including the background colors of the new conversation button, the send button and the messages sent by the customer.
It is recommended that you avoid using a light color for the primary color as it is designed to be used with white text.
Authorization/Identity
Messenger automatically handles the identification of the user. On opening the Messenger, the customer is asked for his/her email address. Based on that email address, a token (which we refer to as Fingerprint ID) is generated which will be used to track the user's session.
However, you can preset the email address and the Fingerprint ID to ease the customer's onboarding process and offer a smoother user experience.
There's 2 auth modes that Messenger accepts
.auto= generates the fingerprintID and stores it in NSUserDefaults. Note that this fingerprint will be lost on uninstall(along withNSUserDefaults). We'll ask the user for email when they try to create a conversation for the first time, and store it for later sessions inNSUserDefaults.standard. The keys that'll be used for storage are as follows:- Fingerprint:
Kayako.fingerprintID - User email:
Kayako.UserLoginInfo.email - User name:
Kayako.UserLoginInfo.name
- Fingerprint:
.fingerprints(fingerprintID, loginInfo)= for advanced users only. This let's you pass in email and other user information. LoginInfo is simply a struct that contains the user's name and email.
Fingerprint ID
A Fingerprint ID is used to resume the user's session. If a new Fingerprint ID is generated or used, then the user will go through an onboarding process. If an existing Fingerprint ID is used, then the user will not go through the onboarding process and will have access to all of his/her previous conversations.
The Fingerprint ID follows the UUID v4 conventions. It is not a random string.
Passing in user details
Simply create a UserLoginInfo object and a fingerprintID, and pass it in the initializer of the Configuration object.
let userInfo = try UserLoginInfo(email: "email@example.com", name: "Example")
// ‼️ `try` can fail if it's not a valid email

let auth = Authorization.fingerprints(fingerprintID: "your fingerprint", userInfo: userInfo)

let authorization = AuthorizationCreation.manual(auth)
//pass authorization in the `authorization` param in the `Configuration` init
Deleting User Data
To clear out the user data(say, in the event of a log out), simply post a notification from NotificationCenter.default
NotificationCenter.default.post(name: KayakoNotifications.clearMessenger, object: nil)
We'd suggest not doing this while the messenger is open, because this would probably create weird inconsistent states.
Background
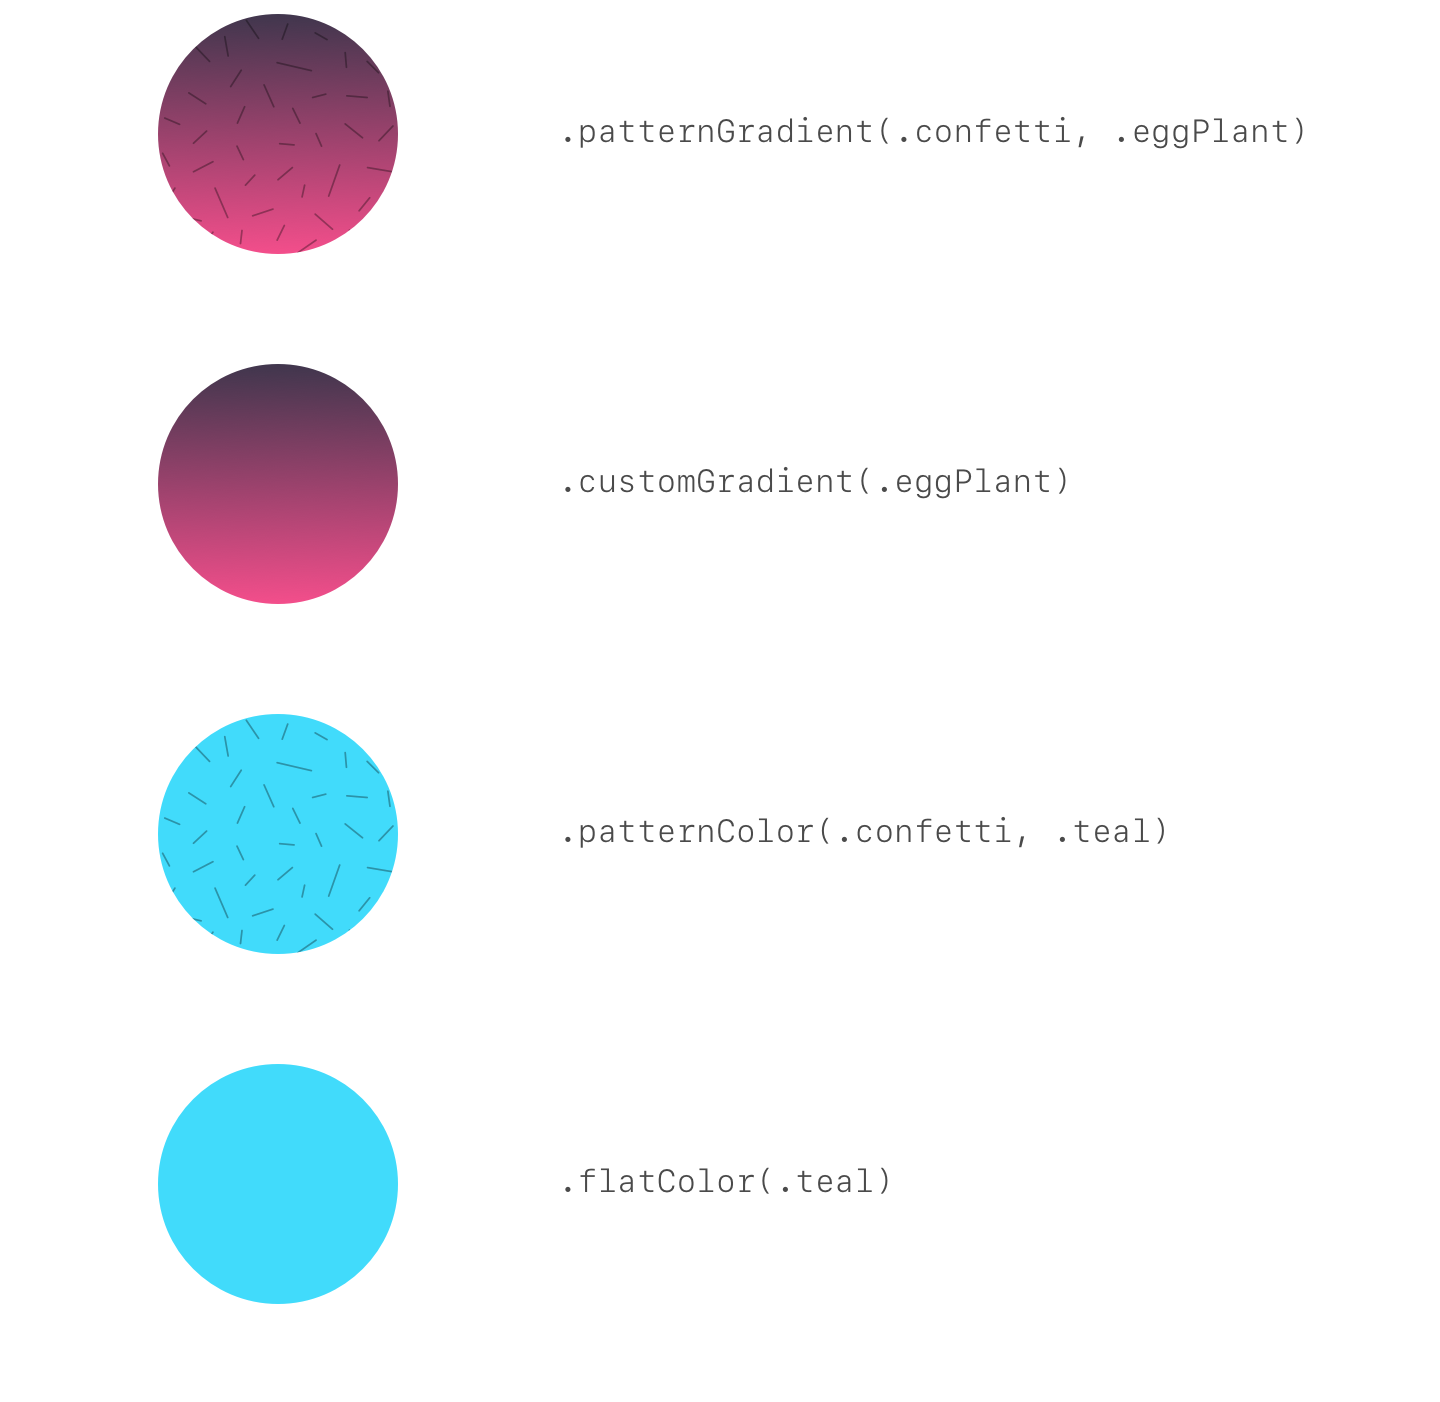
There's 4 options to customize backgrounds in Messenger. Note that all backgrounds are implemented as CALayers, and so we don't have to worry about backgrounds messing up the view hierarchy.
.flatColor(UIColor)= a flat UIColor.customGradient([UIColor])= a 0° gradient with custom colors.image(UIImage)= an image. Make sure you supply a sufficienly high res image.patternColor(UIImage, UIColor)= flat color with patterns.patternGradient(UIImage, [UIColor])= gradient with patterns(you may have noticed this being used on our website)
Here's a diagram of what our backgrounds look like in various modes:

Patterns
The .patternGradient and .patternColor cases in the Background enum accept regular UIImages. However, in order to invoke our predefined patterns, we can use the BackgroundPattern enum.
The predefined ones are (each of these are available with both dark and light tones):
.cheerios.confetti.constellation.dots.mosaic.nachos.polka.sand.stars.zigzag
The tones are also an enum, with values:
.dark.light
Note that swift enums can't have UIImage rawValues, so you have to add an image suffix to get the actual image object. For example, for the actual constellation pattern, you'll have to use BackgroundPattern.confetti.image(tone: .light)


Gradients
The .customGradient and patternGradient cases in the Background enum accept an array of UIColor. However, in order to invoke our predefined patterns, we can use the GradientColor enum.
The predefined ones are:
.beetroot.peach.rawMango.greenApple.aqua.midnightBlue.eggPlant
Again, swift enums can't have [UIColor] rawValues(We're gonna submit a radar 📡), so you'll have to add a colors suffix to get the actual colors. For example, for the actual eggplant gradient, you'll have to use GradientColor.eggplant.colors


Flat Colors
The .flatColor and patternColor cases in the Background enum accept a UIColor. However, in order to invoke our predefined patterns, we can use the FlatColor enum(see a pattern here?).
The predefined ones are:
.red.orange.yellow.green.teal.blue.purple
Again, swift enums can't have UIColor rawValues(We're gonna submit a radar 📡), so you'll have to add a colorValue suffix to get the actual colors. For example, for the actual teal color, you'll have to use FlatColor.teal.colorValue


Working Example
In case you're impatient/have to go to the bathroom real bad, here's a pre-working example to get your started (remember to paste this code before your view controller class declaration)
import KayakoMessenger

func presentMessenger(in viewController: UIViewController) {
    let config = Configuration(brandName: "Kayako", instanceURL: URL(string: "kayako-mobile-testing.kayako.com")!, authorization: .auto, background: .patternGradient(BackgroundPattern.confetti.image(tone: .light), GradientColor.eggPlant.colors), primaryColor: UIColor(red:0.95, green:0.44, blue:0.25, alpha:1.00), homeTitle: "Good Morning ☕️", homeSubtitle: "The real coffee experts. How can we help?", homeTextColor: .white)

    let conversationNav = CustomerSuccessController(config: config)
    conversationNav.modalPresentationStyle = .custom
    let cardTransitionDelegate = CardTransitioningDelegate()
    conversationNav.transitioningDelegate = cardTransitionDelegate
    viewController.present(conversationNav, animated: true) { }
}